|
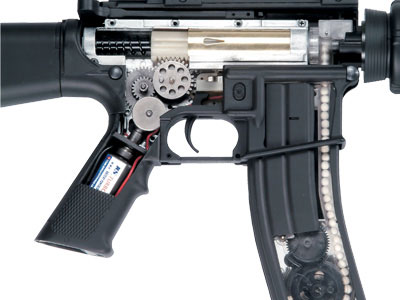
Gearbox the heart of a AEG
1) Tokyo Marui makes 6 types of mech boxes for it's AEGs along with ICS and CA (now five including the UZI), the one shown in the picture to the left is version 2. The basic dis-assembly steps for all mech box is the same, so after going through the process for version 2, you should be able open up the other models accordingly. |
|
Basic workings of a AEG
There are a total of eight screws that holds the mech box together. Take them out in order of the pictures. Four of them are normal philips head, the rest four screws are six sided special ones, you'll need a torx screw driver for them. You'll know which screw is which after you look at the picture. A torx screw driver is required for mech box (gearbox) disassembly.
|
V2 Gearbox
Here is a list of AEG's that use the V2 gearbox, that are made by TM, CA, ICS, AIM, SCR..... Classic Army: CA36C, M15A4-RIS, M15A4-SPC, M15A2 / M15A4 Carbine, M15A2 / M15A4 Tac-Carbine, MP5A2, A3, A4, A5, MP5SD2, SD3, SD5, SD6. ICS: MP5A2, A3, A4, A5, MP5SD2, SD3, SD5, SD6 Tokyo Marui: M4A1, M4-SR16, M16A2, M4-RIS, MP5A4, A5, SD6, SD5, MC51, G3 SG1, G3A3, A4, M16A1, XM177E2, 733, Car 15 |
|
|
|
|
|
|
|
|
See Image 10
Now that all eight screws had been taken out, the mech box can be opened right away. But before you do that, make sure you remember the order of the screws. Not only the length matters, but the presence of a washer is also very important here. Arrange them in order and put them somewhere out of the way, else you may be really sorry later on for not listening to me.
|
|
|
|
|
|
See Image 11
Opening the mech box isn't as easy as simply taking out the screws. You should use a flat screw driver to separate the two halves little by little. First of all, insert a precision screw driver into the rear hole and press down on it to hold the spring guide in place. Then use a flat screw driver to pry the front part open. It's OK to press down on the rear part fairly hard, since you don't want the spring to fly out. I find it also helps to use your finger and press down on the cylinder when taking the top half off.
|
|
|
|
See Image 14
The relationship between the inner parts becomes fairly appearant after you open up the mech box. If you have this photo printed, it'll be easy to disassemble the mech box even without the instructions. Of course, it helps even more to remember it all.
|
See Image 15
First of all, let's take the spring out. The spring is always under some tension, so it'll push backward once you take the spring guide out of place. So be careful when you take it out and don't let it fly all over the place.
|
|
|
|
See Image 16
The piston will come out too, since it's attached to the spring. There's a lot of grease on it so make sure you've got some tissue paper. When you put everything back together, it's better to apply grease again.
|
See Image 17
Next is the tappet plate. Take the spring out first, here a precision driver or pincer will definitly help. Careful not to stretch the spring too much |
|
|
|
See Image 18
After the cylinder and spring assembly is removed, there's nothing left that'll suddenly jump out, so from here on you can take it easy.
|
See Image 19
Now you can separate the cylinder from the tappet plate. Don't worry, nothing'll fly out this time |
|
|


